Spring MVC
- 请求处理流程

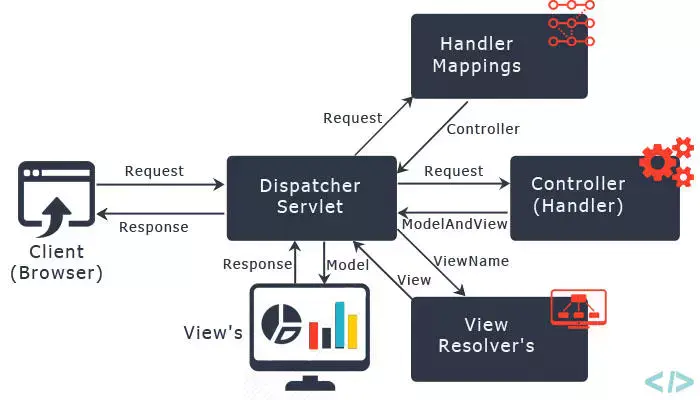
Step 1: 请求会被 DispatcherServlet 接收.
Step 2: DispatcherServlet 根据 HandlerMapping 查找 Controller 类名与 相对应请求路径的映射.
Step 3: 请求被转发到 Controller, controller会处理请求执行相对应的方法并返回ModelAndView object (包含 Model data 和视图名称)返回 DispatcherServlet.
Step 4: DispatcherServlet发送model object给 ViewResolver 获取实际的页面.
Step 5: 最终 DispatcherServlet 通过 Model object 渲染页面展示结果.
DispatcherServlet:前端控制器
用户请求到达前端控制器,它就相当于mvc模式中的c,dispatcherServlet是整个流程控制的中心,由它调用其它组件处理用户的请求,dispatcherServlet的存在降低了组件之间的耦合性。
HandlerMapping:处理器映射器
HandlerMapping负责根据用户请求找到Handler即处理器,SpringMVC提供了不同的映射器实现不同的映射方式,例如:配置文件方式,实现接口方式,注解方式等。
Handler:处理器
它就是我们开发中要编写的具体业务控制器。由DispatcherServlet把用户请求转发到Handler。由Handler对具体的用户请求进行处理。
View Resolver:视图解析器
View Resolver负责将处理结果生成View视图,View Resolver首先根据逻辑视图名解析成物理视图名即具体的页面地址,再生成View视图对象,最后对View进行渲染将处理结果通过页面展示给用户。
View:视图
SpringMVC框架提供了很多的View视图类型的支持,包括:jstlView、freemarkerView、pdfView等。我们最常用的视图就是jsp。 一般情况下需要通过页面标签或页面模版技术将模型数据通过页面展示给用户,需要由程序员根据业务需求开发具体的页面。
配置SpringMVC
- 配置DispatcherServlet
public class Initalizer extends AbstractAnnotationConfigDispatcherServletInitializer {
    @Override
    protected Class<?>[] getRootConfigClasses() {

        return new Class[0];
    }

    @Override
    protected Class<?>[] getServletConfigClasses() {
        return new Class[]{MVCConfig.class};
    }

    @Override
    protected String[] getServletMappings() {
        return new String[]{"/"};
    }
}
// 启用web mvc 以及配置视图解析器
@Configuration
@EnableWebMvc
@ComponentScan("wang.ismy.spring")
public class MVCConfig extends WebMvcConfigurationSupport {

    @Bean
    public ViewResolver viewResolver() {
        InternalResourceViewResolver viewResolver = new InternalResourceViewResolver();

        viewResolver.setPrefix("/WEB-INF/classes/views/");

        viewResolver.setSuffix(".jsp");
        viewResolver.setViewClass(JstlView.class);
        return viewResolver;
    }

    @Override
    protected void configureDefaultServletHandling(DefaultServletHandlerConfigurer configurer) {
        configurer.enable();
    }
}
使用以上代码可以使用java代码配置dispatcherServlet 原因:servlet3.0中,容器会在类路径查找实现了ServletContainerInitializer的类 Spring提供了该实现,叫做SpringServletContainerInitializer 此类会反过来查找WebApplicationInitializer的实现,而AbstractAnnotationConfigDispatcherServletInitializer就是它的一个实现
控制器编写
@org.springframework.stereotype.Controller
public class Controller {

    @RequestMapping("/home")
    public String hello(){
        return "home";
    }
}
@RequestMapping
可用在类上以及方法上
- 最终映射路径=类上的路径+方法上的路径
public @interface RequestMapping {
    // 控制器名称,一般不用
    String name() default "";
    // 同path
    @AliasFor("path")
    String[] value() default {};
    // 映射路径
    @AliasFor("value")
    String[] path() default {};
    // 请求方法
    RequestMethod[] method() default {};
    // 限定请求参数条件
    String[] params() default {};
    // 限定请求头
    String[] headers() default {};

    String[] consumes() default {};

    String[] produces() default {};

}
向视图传递数据
@RequestMapping("/home")
    public String hello(ModelAndView modelAndView){

        modelAndView.addObject("time", LocalDate.now());
        return "home";
    }
接收请求的输入
- @RequestParam
- @PathVariable
表单处理
接收数据
@PostMapping("/form")
  public String form(Person person){
      System.out.println(person);
      return "home";
}
<form action="./form" method="post"> <input name="user" type="text"> <input name="password" type="password"> <input type="submit"> </form>
绑定集合
````/user/hello?names=1&names=2```
自定义类型转换器
public class LocalDateConvert implements Converter<String, LocalDate> {
    @Override
    public LocalDate convert(String source) {
        return LocalDate.parse(source);
    }
}
<bean id="converterService" class="org.springframework.context.support.ConversionServiceFactoryBean">
        <property name="converters">
            <set>
                <bean class="wang.ismy.spring.mvc.LocalDateConvert"/>
            </set>
        </property>
    </bean>
- 表单校验
public class Person {
    @NotBlank
    private String username;
    @NotBlank
    private String password;
}
@PostMapping("/form")
    public String form(@Valid Person person, Errors errors){
        if (errors.hasErrors()){
            throw new RuntimeException(errors.getAllErrors().get(0).getDefaultMessage());
        }
        System.out.println(person);
        return "home";
    }
`
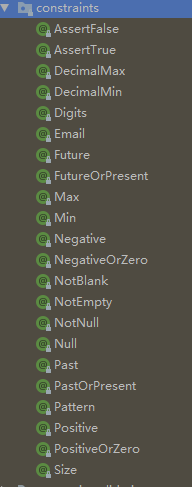
valid api:

获取servlet api
@RequestMapping("/hello")
    public String hello(HttpServletRequest request, HttpServletResponse response){
        System.out.println(request+""+response);
        return "hello";
    }
注解
- @RequestParam
- @RequestBody
- @PathVaribale
- @RequestHeader
- @CookieValue
- @ModelAttribute
- @SessionAttribute
XML配置
- 配置前端控制器
<servlet>
    <servlet-name>dispatcher</servlet-name>
    <servlet-class>org.springframework.web.servlet.DispatcherServlet</servlet-class>
    <init-param>
      <param-name>contextConfigLocation</param-name>
      <param-value>classpath:spring-mvc.xml</param-value>
    </init-param>
  </servlet>

  <servlet-mapping>
    <servlet-name>dispatcher</servlet-name>
    <url-pattern>/</url-pattern>
  </servlet-mapping>
- spring配置文件
<?xml version="1.0" encoding="UTF-8"?>
<beans xmlns="http://www.springframework.org/schema/beans"
       xmlns:xsi="http://www.w3.org/2001/XMLSchema-instance"
       xmlns:context="http://www.springframework.org/schema/context"
       xmlns:mvc="http://www.springframework.org/schema/mvc"

       xsi:schemaLocation="http://www.springframework.org/schema/beans http://www.springframework.org/schema/beans/spring-beans.xsd http://www.springframework.org/schema/context https://www.springframework.org/schema/context/spring-context.xsd http://www.springframework.org/schema/cache http://www.springframework.org/schema/cache/spring-cache.xsd http://www.springframework.org/schema/mvc https://www.springframework.org/schema/mvc/spring-mvc.xsd">

    <context:component-scan base-package="wang.ismy.spring.mvc"/>

    <!--视图解析器-->
    <bean class="org.springframework.web.servlet.view.InternalResourceViewResolver">
        <property name="prefix" value="/WEB-INF/views/"/>
        <property name="suffix" value=".jsp"/>
    </bean>

    <!--开启MVC注解支持-->
    <mvc:annotation-driven/>
</beans>